Changelog
New updates and improvements at Cloudflare.

The Cisco IOS XE third-party integration guide for Cloudflare WAN has been updated to include:
- Post Quantum Cryptography (PQC)
- Policy-Based Routing (PBR)
- IP Service Level Agreement (IP SLA)
This link will take you directly to the updated Cisco IOS XE guide.
Starting with
cloudflaredversion 2026.5.2 ↗, Cloudflare Tunnel automates the entire connectivity pre-checks workflow directly inside the binary. Previously, customers had to installdigandnetcatand run those commands by hand to verify their environment. Nowcloudflareddoes it natively at startup — and surfaces actionable remediation when something is blocked.
On every
cloudflared tunnel run(andcloudflared tunnel diag), the binary now natively checks:- DNS resolution —
region1.v2.argotunnel.comandregion2.v2.argotunnel.comresolve to valid Cloudflare IPs. - Transport connectivity — outbound
UDP (QUIC)andTCP (HTTP/2)on port7844. - Management API — outbound
TCP/443toapi.cloudflare.comfor software updates.
Results are printed in a scannable CLI table with three states:
- ✅ Pass — the check succeeded.
- ⚠️ Warn — a non-blocking issue, for example the Management API is unreachable so automatic updates will not work, but the tunnel will still come up.
- ❌ Fail — a blocking issue, with a specific remediation hint (for example,
Allow outbound UDP on port 7844).
If DNS is unresolvable, or both UDP and TCP fail on port 7844,
cloudflaredexits early with the failure rather than looping on opaquefailed to dialerrors.Pre-checks now run automatically on every start, which also catches regressions like overnight firewall policy changes — no need to remember to rerun the troubleshooting guide.
To get the new behavior, upgrade
cloudflaredto version2026.5.2or later. For more details, refer to the Connectivity pre-checks documentation.- DNS resolution —
You can now scope Cloudflare permissions to individual Cloudflare Tunnel instances and Cloudflare Mesh nodes. Administrators can delegate access to specific Tunnels or Mesh nodes without granting account-wide control over private networking.
When you add a member or create a permission policy, the resource picker now lists Cloudflare Tunnel instances and Cloudflare Mesh nodes as scopable resource types. You can:
- Grant a read-only role on a single Cloudflare Tunnel instance to a support operator for log streaming and diagnostics — without exposing other Tunnels or destructive actions.
- Grant a write role on a specific Cloudflare Mesh node to an application team — without giving them access to the rest of your private network.
- Scope a single policy to one or many Tunnels and Mesh nodes at once.
Granular permissions are a parallel layer to existing account-level roles — they do not replace them.
- Existing account-level roles continue to work. A member with
Cloudflare AccessorCloudflare Zero Trustretains write access to every Tunnel and Mesh node in the account. This ensures backward compatibility for existing automation and tokens. - Granular permissions are additive. For any API request on a specific Tunnel or Mesh node, access is granted if the principal has either the account-level role or a granular permission for that resource.
- Resource enumeration is authorization-aware. Listing endpoints (
GET /accounts/{id}/cfd_tunnel,GET /accounts/{id}/warp_connector) return only the resources the principal has at least read access to.
- Configure granular permissions for Cloudflare Tunnel.
- Configure granular permissions for Cloudflare Tunnel and Cloudflare Mesh in Cloudflare One.
- Review the resource-scoped roles on the Cloudflare role reference.
Network Analytics is now fully supported for accounts using Unified Routing mode. Traffic that traverses Unified Routing onramps and offramps is now visible in Network Analytics with the same dimensions and filters as traffic on the standard data plane.
This closes a parity gap for customers who had moved tunnels onto Unified Routing and lost visibility into their dataplane traffic in the Network Analytics dashboard. No configuration change is required — analytics data is collected automatically for all accounts with Unified Routing enabled.
For the remaining beta limitations, refer to Traffic steering beta limitations.
New Magic Transit and Cloudflare WAN accounts are now assigned a single IPv4 anycast address by default.
Cloudflare handles failures on its network automatically by advertising your endpoint IP from multiple nodes across many globally distributed data centers. To handle failures on your network, configure two tunnels from separate routers.
To request additional anycast IP addresses for your account, contact your account team.
For tunnel configuration guidance, refer to Configure tunnel endpoints for Cloudflare WAN or Configure tunnel endpoints for Magic Transit.
Cloudflare IPsec now supports the standard NAT traversal (NAT-T) flow, where IKE begins on UDP port
500and switches to UDP port4500after NAT is detected.Previously, devices behind NAT had to be configured to initiate IKE on UDP port
4500directly. Devices that started on UDP port500could not complete the IKE handshake when NAT was in the path. This required custom configuration on devices such as VeloCloud SD-WAN edges, Cisco IOS-XE routers, and Juniper SRX firewalls, and was not possible on every platform.What changed:
- Devices behind NAT can now initiate IKE on either UDP port
500or UDP port4500. - Devices that start IKE on UDP port
500and switch to UDP port4500after NAT detection now complete the handshake successfully. - No configuration change is required on Cloudflare. The change is available for all IPsec tunnels on Cloudflare WAN and Magic Transit.
This change does not affect existing tunnels:
- Tunnels using UDP port
500with no NAT detected continue to operate as before. - Tunnels configured to start IKE on UDP port
4500continue to operate as before. - NAT detection logic is unchanged.
For configuration details, refer to GRE and IPsec tunnels.
- Devices behind NAT can now initiate IKE on either UDP port
When the Cloudflare One Appliance is acting as the DHCP server for a LAN, you can now configure custom DHCP options on the leases it issues. This unlocks workflows such as PXE / iPXE boot, VoIP phone provisioning, and vendor-specific client configuration.
Each option is defined by
option_number,value, and one of four value types:text,integer,hex, orip. Configurations are validated on the appliance before being applied — invalid configurations are rejected and the underlying error is returned to the API caller, so a bad option will not disrupt the live DHCP service.For details, refer to DHCP server options.
Breakout and traffic prioritization rules on the Cloudflare One Appliance can now match by source in addition to destination application. You can pin breakout or priority behavior to:
- A source LAN interface — VLANs attached to that LAN are included automatically.
- A source IP address, range, or CIDR block.
This is the natural way to break out a guest VLAN to the local Internet, or to prioritize traffic from a specific subnet, without enumerating destination applications.
For details, refer to Breakout traffic.
You can now create, rotate, and delete Cloudflare One Virtual Appliance instances and their license keys directly via the API and Terraform.
- Create a virtual appliance and receive a license key:
POST /accounts/{account_id}/magic/connectorswithdevice.provision_license: true. - Rotate the license key for an existing virtual appliance:
PATCH /accounts/{account_id}/magic/connectors/{connector_id}withprovision_license: true. The previous key is immediately and irrevocably revoked. - Delete a virtual appliance to release the associated licensed device.
The license key is returned in the response only once, at create or rotate time. Copy and store it securely.
For details, refer to Configure a Cloudflare One Virtual Appliance.
- Create a virtual appliance and receive a license key:
Cloudflare IPsec now supports post-quantum key agreement with compatible third-party devices. Cisco ↗ and Fortinet ↗ are the first third-party vendors validated to interoperate with Cloudflare IPsec using ML-KEM (Module-Lattice-Based Key-Encapsulation Mechanism).
Post-quantum IPsec uses RFC 9370 ↗ and draft-ietf-ipsecme-ikev2-mlkem ↗ to negotiate hybrid key agreement during the IKEv2
IKE_INTERMEDIATEphase. This combines classical Diffie-Hellman (Group 20) with ML-KEM-768 or ML-KEM-1024 to protect against harvest-now, decrypt-later ↗ attacks.Key details:
- Compatible with Cisco 8000 Series Secure Routers with IOS XR Release 26.1.1 and Fortinet FortiOS 7.6.6 and later.
- Uses ML-KEM-768 or ML-KEM-1024 as an additional Key Exchange to DH Group 20.
- Follows RFC 9370 and draft-ietf-ipsecme-ikev2-mlkem standards.
- No additional licensing required.
Post-quantum IPsec with third-party devices is now generally available with confirmed interoperability for the platforms listed above. Cloudflare intends to support interoperability with more vendors as they build out support for draft-ietf-ipsecme-ikev2-mlkem. Contact your account team to discuss support for additional vendors.
For supported key exchange methods and the list of validated platforms, refer to GRE and IPsec tunnels.
Cloudflare Advanced Network Firewall Country rules are now supported for accounts using Unified Routing mode. This feature requires a Cloudflare Advanced Network Firewall subscription.
You can create firewall rules that match traffic based on source or destination country to enforce geographic access policies across your network.
This is the first of the Cloudflare Advanced Network Firewall features to become available in Unified Routing. Support for additional features - IP Lists, ASN Lists, Threat Intel Lists, IDS, Rate Limiting, SIP, and Managed Rulesets - is planned.
For the full list of current beta limitations, refer to Traffic steering beta limitations.
Cloudflare One Appliance now supports Link Aggregation Control Protocol (LACP), allowing you to bundle up to six physical LAN ports into a single logical interface. Link aggregation increases available bandwidth and eliminates single points of failure on the LAN side of the appliance.
This feature is available in beta on physical appliance hardware with the latest OS. No entitlement is required.
To configure a Link Aggregation Group, refer to Configure link aggregation groups.
Two new fields are now available in rule expressions that surface Layer 4 transport telemetry from the client connection. Together with the existing
cf.timings.client_tcp_rtt_msecfield, these fields give you a complete picture of connection quality for both TCP and QUIC traffic — enabling transport-aware rules without requiring any client-side changes.Previously, QUIC RTT and delivery rate data was only available via the
Server-Timing: cfL4response header. These new fields make the same data available directly in rule expressions, so you can use them in Transform Rules, WAF Custom Rules, and other phases that support dynamic fields.Field Type Description cf.timings.client_quic_rtt_msecInteger The smoothed QUIC round-trip time (RTT) between Cloudflare and the client in milliseconds. Only populated for QUIC (HTTP/3) connections. Returns 0for TCP connections.cf.edge.l4.delivery_rateInteger The most recent data delivery rate estimate for the client connection, in bytes per second. Returns 0when L4 statistics are not available for the request.Use a request header transform rule to tag requests from high-latency connections, so your origin can serve a lighter page variant:
Rule expression:
cf.timings.client_tcp_rtt_msec > 200 or cf.timings.client_quic_rtt_msec > 200Header modifications:
Operation Header name Value Set X-High-Latencytruecf.edge.l4.delivery_rate > 0 and cf.edge.l4.delivery_rate < 100000For more information, refer to Request Header Transform Rules and the fields reference.
Cloudflare now exposes four new fields in the Transform Rules phase that encode client certificate data in RFC 9440 ↗ format. Previously, forwarding client certificate information to your origin required custom parsing of PEM-encoded fields or non-standard HTTP header formats. These new fields produce output in the standardized
Client-CertandClient-Cert-Chainheader format defined by RFC 9440, so your origin can consume them directly without any additional decoding logic.Each certificate is DER-encoded, Base64-encoded, and wrapped in colons. For example,
:MIIDsT...Vw==:. A chain of intermediates is expressed as a comma-separated list of such values.Field Type Description cf.tls_client_auth.cert_rfc9440String The client leaf certificate in RFC 9440 format. Empty if no client certificate was presented. cf.tls_client_auth.cert_rfc9440_too_largeBoolean trueif the leaf certificate exceeded 10 KB and was omitted. In practice this will almost always befalse.cf.tls_client_auth.cert_chain_rfc9440String The intermediate certificate chain in RFC 9440 format as a comma-separated list. Empty if no intermediate certificates were sent or if the chain exceeded 16 KB. cf.tls_client_auth.cert_chain_rfc9440_too_largeBoolean trueif the intermediate chain exceeded 16 KB and was omitted.The chain encoding follows the same ordering as the TLS handshake: the certificate closest to the leaf appears first, working up toward the trust anchor. The root certificate is not included.
Add a request header transform rule to set the
Client-CertandClient-Cert-Chainheaders on requests forwarded to your origin server. For example, to forward headers for verified, non-revoked certificates:Rule expression:
cf.tls_client_auth.cert_verified and not cf.tls_client_auth.cert_revokedHeader modifications:
Operation Header name Value Set Client-Certcf.tls_client_auth.cert_rfc9440Set Client-Cert-Chaincf.tls_client_auth.cert_chain_rfc9440To get the most out of these fields, upload your client CA certificate to Cloudflare so that Cloudflare validates the client certificate at the edge and populates
cf.tls_client_auth.cert_verifiedandcf.tls_client_auth.cert_revoked.For more information, refer to Mutual TLS authentication, Request Header Transform Rules, and the fields reference.
The top-level Interconnects page in the Cloudflare dashboard has been removed. Interconnects are now located under Connectors > Interconnects.
Your existing configurations and functionality remain the same.
In the Cloudflare One dashboard, the overview page for a specific Cloudflare Tunnel now shows all replicas of that tunnel and supports streaming logs from multiple replicas at once.
Previously, you could only stream logs from one replica at a time. With this update:
- Replicas on the tunnel overview — All active replicas for the selected tunnel now appear on that tunnel's overview page under Connectors. Select any replica to stream its logs.
- Multi-connector log streaming — Stream logs from multiple replicas simultaneously, making it easier to correlate events across your infrastructure during debugging or incident response. To try it out, log in to Cloudflare One ↗ and go to Networks > Connectors > Cloudflare Tunnels. Select View logs next to the tunnel you want to monitor.
For more information, refer to Tunnel log streams and Deploy replicas.
You can now manage Cloudflare Tunnels directly from Wrangler, the CLI for the Cloudflare Developer Platform. The new
wrangler tunnelcommands let you create, run, and manage tunnels without leaving your terminal.
Available commands:
wrangler tunnel create— Create a new remotely managed tunnel.wrangler tunnel list— List all tunnels in your account.wrangler tunnel info— Display details about a specific tunnel.wrangler tunnel delete— Delete a tunnel.wrangler tunnel run— Run a tunnel using the cloudflared daemon.wrangler tunnel quick-start— Start a free, temporary tunnel without an account using Quick Tunnels.
Wrangler handles downloading and managing the cloudflared binary automatically. On first use, you will be prompted to download
cloudflaredto a local cache directory.These commands are currently experimental and may change without notice.
To get started, refer to the Wrangler tunnel commands documentation.
The
cf.timings.worker_msecfield is now available in the Ruleset Engine. This field reports the wall-clock time that a Cloudflare Worker spent handling a request, measured in milliseconds.You can use this field to identify slow Worker executions, detect performance regressions, or build rules that respond differently based on Worker processing time, such as logging requests that exceed a latency threshold.
Field Type Description cf.timings.worker_msecInteger The time spent executing a Cloudflare Worker in milliseconds. Returns 0if no Worker was invoked.Example filter expression:
cf.timings.worker_msec > 500For more information, refer to the Fields reference.
Cloudflare Tunnel is now available in the main Cloudflare Dashboard at Networking > Tunnels ↗, bringing first-class Tunnel management to developers using Tunnel for securing origin servers.
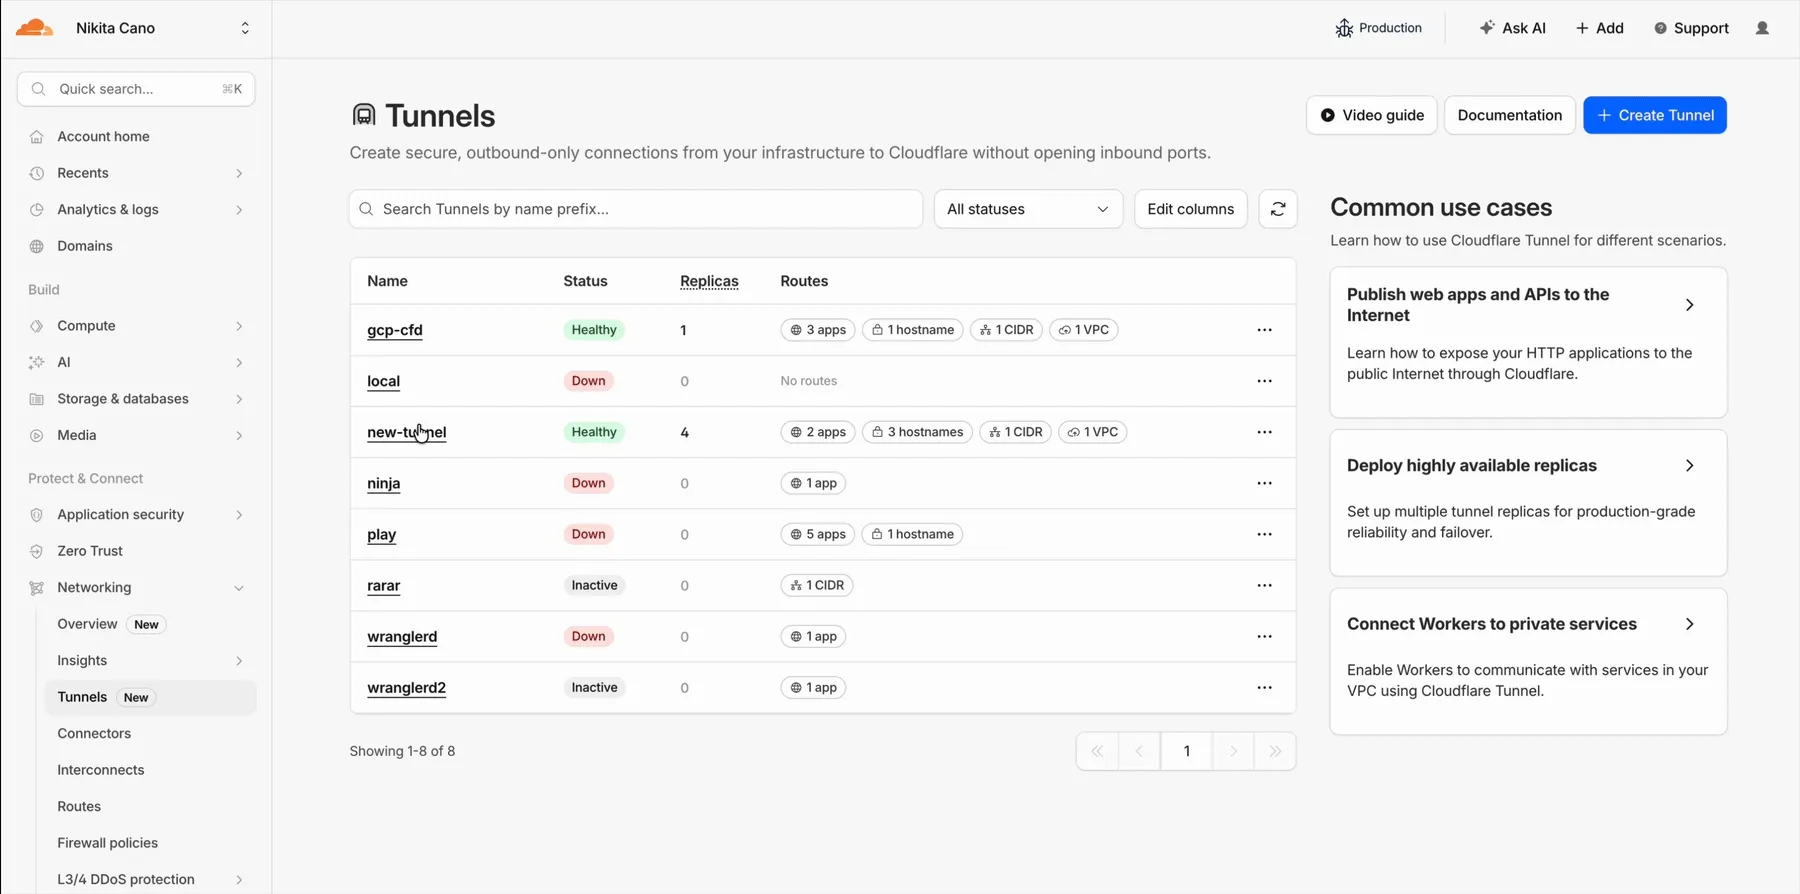
This new experience provides everything you need to manage Tunnels for public applications, including:
- Full Tunnel lifecycle management: Create, configure, delete, and monitor all your Tunnels in one place.
- Native integrations: View Tunnels by name when configuring DNS records and Workers VPC — no more copy-pasting UUIDs.
- Real-time visibility: Monitor replicas and Tunnel health status directly in the dashboard.
- Routing map: Manage all ingress routes for your Tunnel, including public applications, private hostnames, private CIDRs, and Workers VPC services, from a single interactive interface.
Core Dashboard: Navigate to Networking > Tunnels ↗ to manage Tunnels for:
- Securing origin servers and public applications with CDN, WAF, Load Balancing, and DDoS protection
- Connecting Workers to private services via Workers VPC
Cloudflare One Dashboard: Navigate to Zero Trust > Networks > Connectors ↗ to manage Tunnels for:
- Securing your public applications with Zero Trust access policies
- Connecting users to private applications
- Building a private mesh network
Both dashboards provide complete Tunnel management capabilities — choose based on your primary workflow.
New to Tunnel? Learn how to get started with Cloudflare Tunnel or explore advanced use cases like securing SSH servers or running Tunnels in Kubernetes.
We are updating naming related to some of our Networking products to better clarify their place in the Zero Trust and Secure Access Service Edge (SASE) journey.
We are retiring some older brand names in favor of names that describe exactly what the products do within your network. We are doing this to help customers build better, clearer mental models for comprehensive SASE architecture delivered on Cloudflare.
- Magic WAN → Cloudflare WAN
- Magic WAN IPsec → Cloudflare IPsec
- Magic WAN GRE → Cloudflare GRE
- Magic WAN Connector → Cloudflare One Appliance
- Magic Firewall → Cloudflare Network Firewall
- Magic Network Monitoring → Network Flow
- Magic Cloud Networking → Cloudflare One Multi-cloud Networking
No action is required by you — all functionality, existing configurations, and billing will remain exactly the same.
For more information, visit the Cloudflare One documentation.
Cloudflare WAN now displays your Anycast IP addresses directly in the dashboard when you configure IPsec or GRE tunnels.
Previously, customers received their Anycast IPs during onboarding or had to retrieve them with an API call. The dashboard now pre-loads these addresses, reducing setup friction and preventing configuration errors.
No action is required. All Cloudflare WAN customers can see their Anycast IPs in the tunnel configuration form automatically.
For more information, refer to Configure tunnel endpoints.
Cloudflare One Appliance version 2026.2.0 adds post-quantum encryption support using hybrid ML-KEM (Module-Lattice-Based Key-Encapsulation Mechanism).
The appliance now uses TLS 1.3 with hybrid ML-KEM for its connection to the Cloudflare edge. During the TLS handshake, the appliance and the edge share a symmetric secret over the TLS connection and inject it into the ESP layer of IPsec. This protects IPsec data plane traffic against harvest-now, decrypt-later attacks.
This upgrade deploys automatically to all appliances during their configured interrupt windows with no manual action required.
For more information, refer to Cloudflare One Appliance.
Magic WAN and Magic Transit customers can use the Cloudflare dashboard to configure and manage BGP peering between their networks and their Magic routing table when using IPsec and GRE tunnel on-ramps (beta).
Using BGP peering allows customers to:
- Automate the process of adding or removing networks and subnets.
- Take advantage of failure detection and session recovery features.
With this functionality, customers can:
- Establish an eBGP session between their devices and the Magic WAN / Magic Transit service when connected via IPsec and GRE tunnel on-ramps.
- Secure the session by MD5 authentication to prevent misconfigurations.
- Exchange routes dynamically between their devices and their Magic routing table.
For configuration details, refer to:
Cloudflare source IPs are the IP addresses used by Cloudflare services (such as Load Balancing, Gateway, and Browser Isolation) when sending traffic to your private networks.
For customers using legacy mode routing, traffic to private networks is sourced from public Cloudflare IPs, which may cause IP conflicts. For customers using Unified Routing mode (beta), traffic to private networks is sourced from dedicated, non-Internet-routable private IPv4 range to ensure:
- Symmetric routing over private network connections
- Proper firewall state preservation
- Private traffic stays on secure paths
Key details:
- IPv4: Sourced from
100.64.0.0/12by default, configurable to any/12CIDR - IPv6: Sourced from
2606:4700:cf1:5000::/64(not configurable) - Affected connectors: GRE, IPsec, CNI, WARP Connector, and WARP Client (Cloudflare Tunnel is not affected)
Configuring Cloudflare source IPs requires Unified Routing (beta) and the
Cloudflare One Networks Writepermission.For configuration details, refer to Configure Cloudflare source IPs.
You can now control how Cloudflare buffers HTTP request and response bodies using two new settings in Configuration Rules.
Controls how Cloudflare buffers HTTP request bodies before forwarding them to your origin server:
Mode Behavior Standard (default) Cloudflare can inspect a prefix of the request body for enabled functionality such as WAF and Bot Management. Full Buffers the entire request body before sending to origin. None No buffering — the request body streams directly to origin without inspection. Controls how Cloudflare buffers HTTP response bodies before forwarding them to the client:
Mode Behavior Standard (default) Cloudflare can inspect a prefix of the response body for enabled functionality. None No buffering — the response body streams directly to the client without inspection. {"action": "set_config","action_parameters": {"request_body_buffering": "standard","response_body_buffering": "none"}}For more information, refer to Configuration Rules.