
We've revamped the Workers Metrics dashboard ↗.
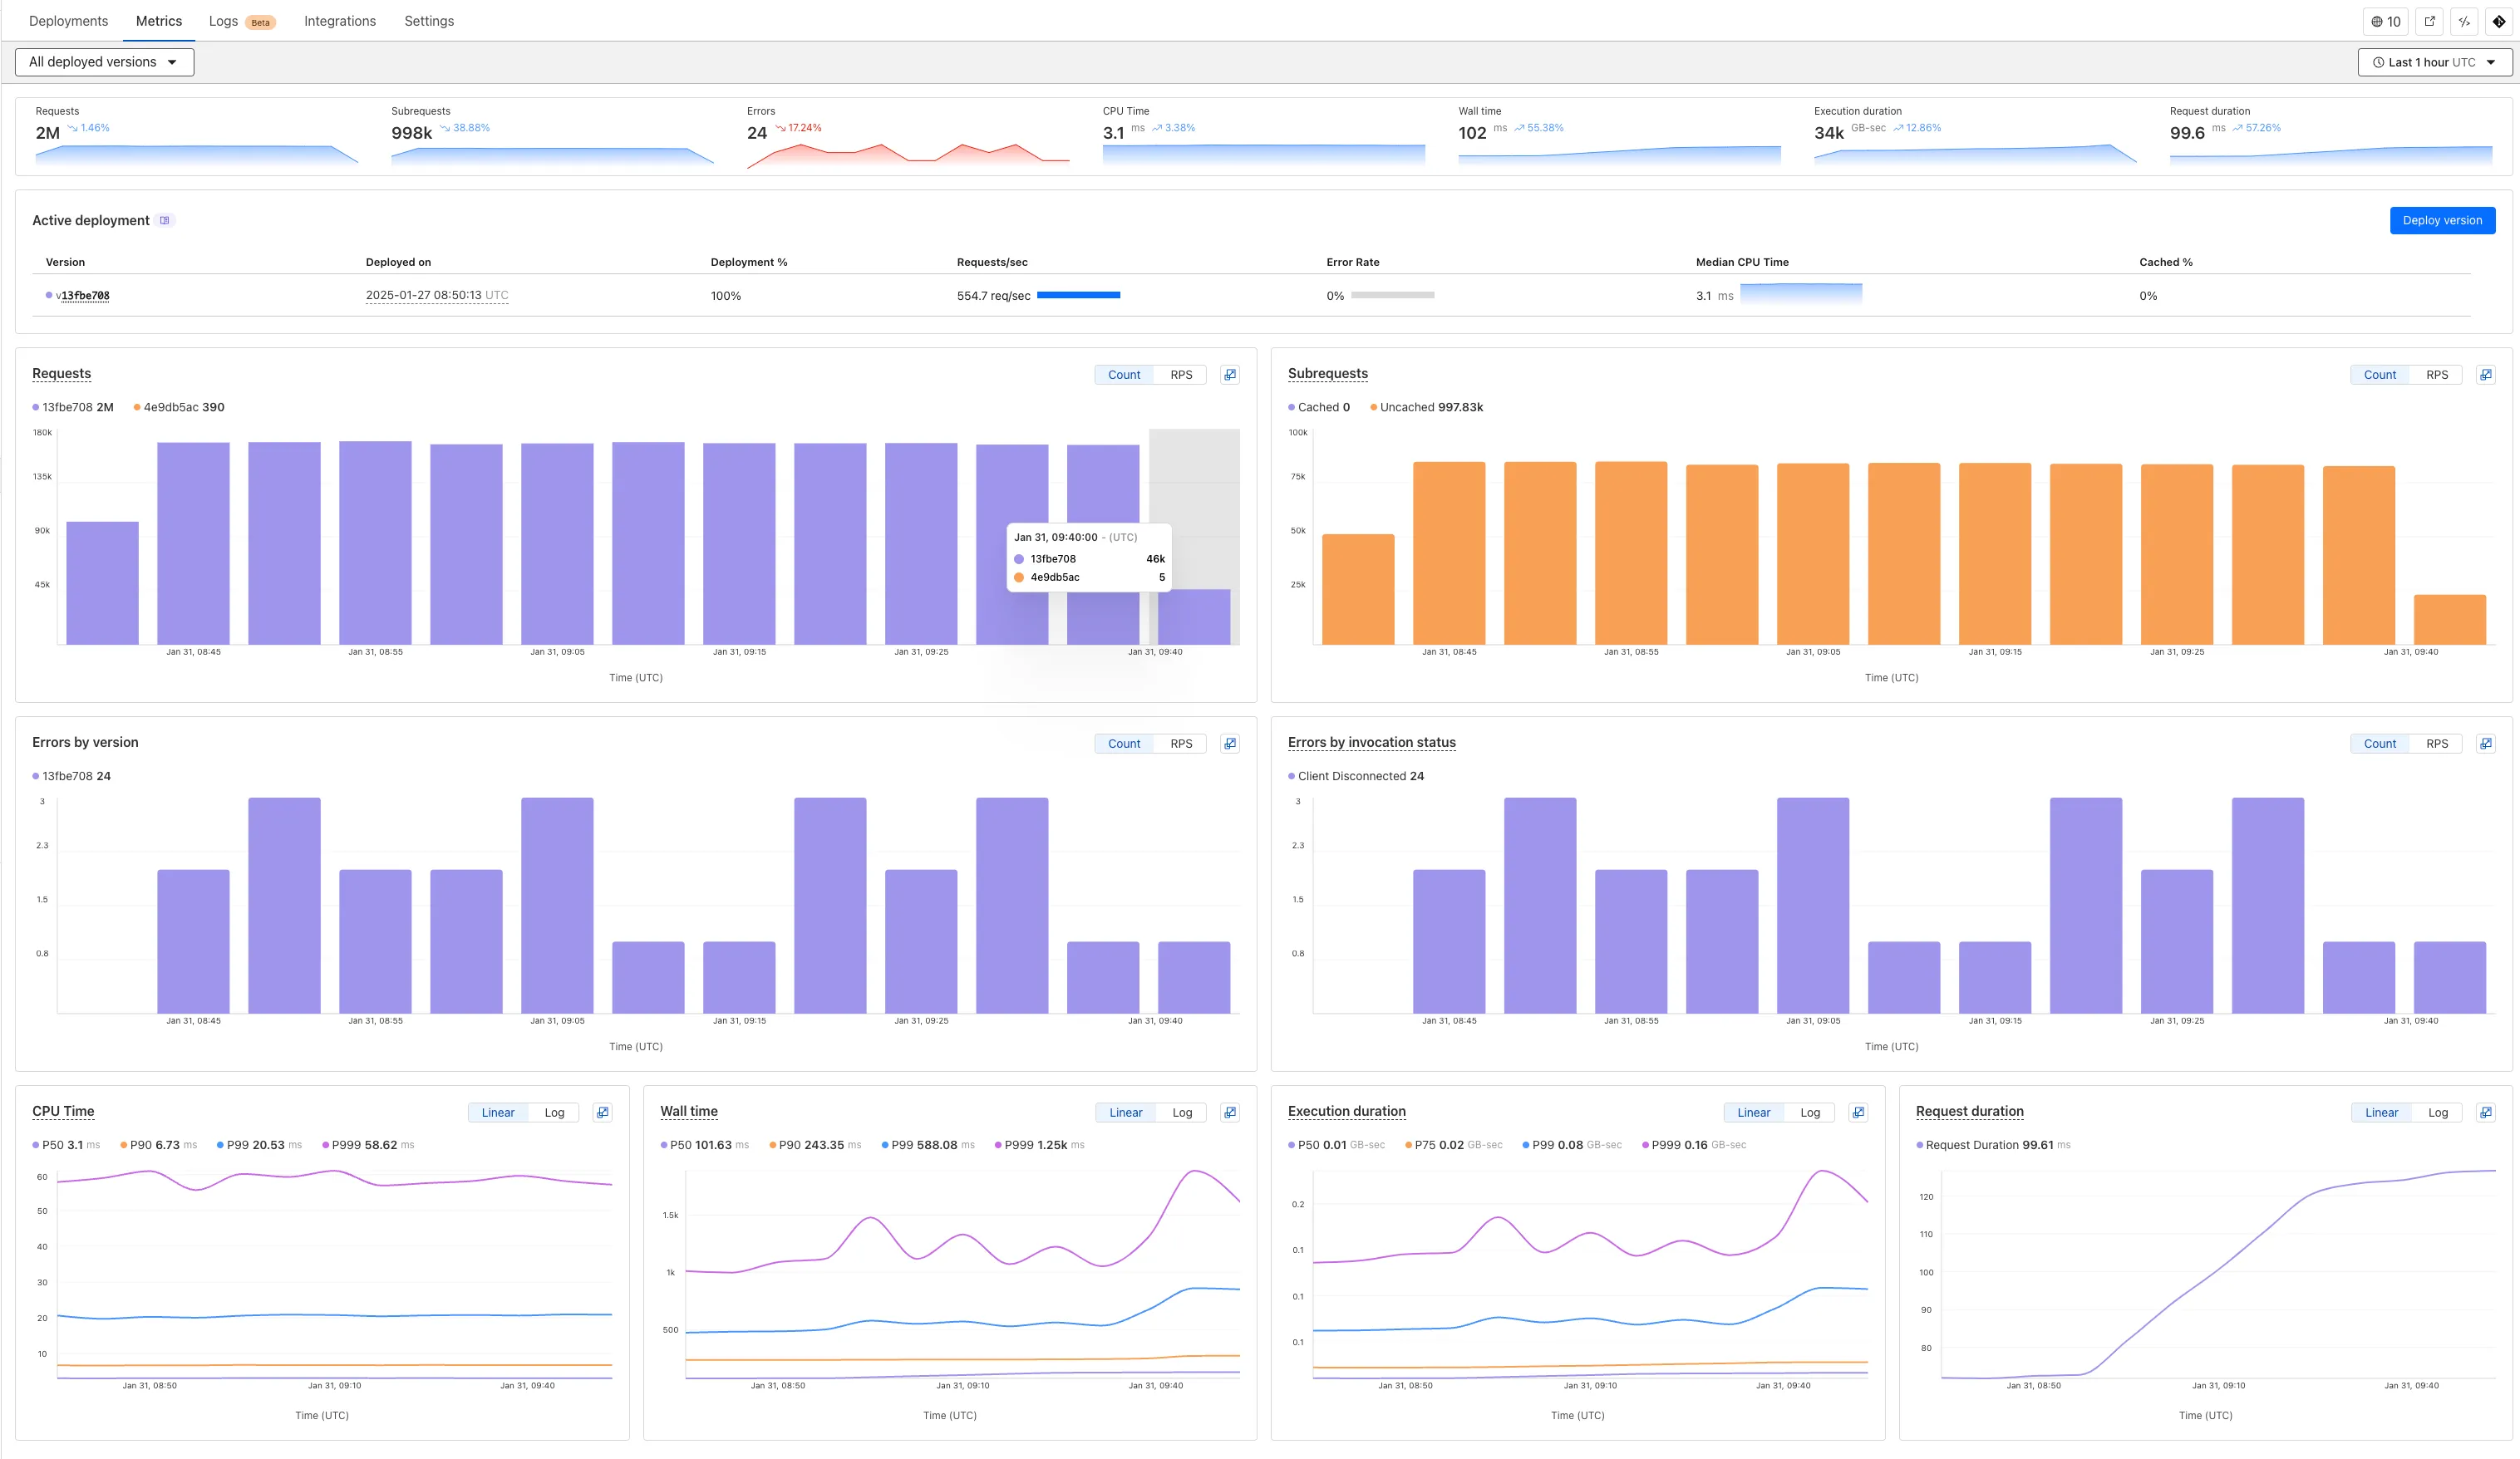
Now you can easily compare metrics across Worker versions, understand the current state of a gradual deployment, and review key Workers metrics in a single view. This new interface enables you to:
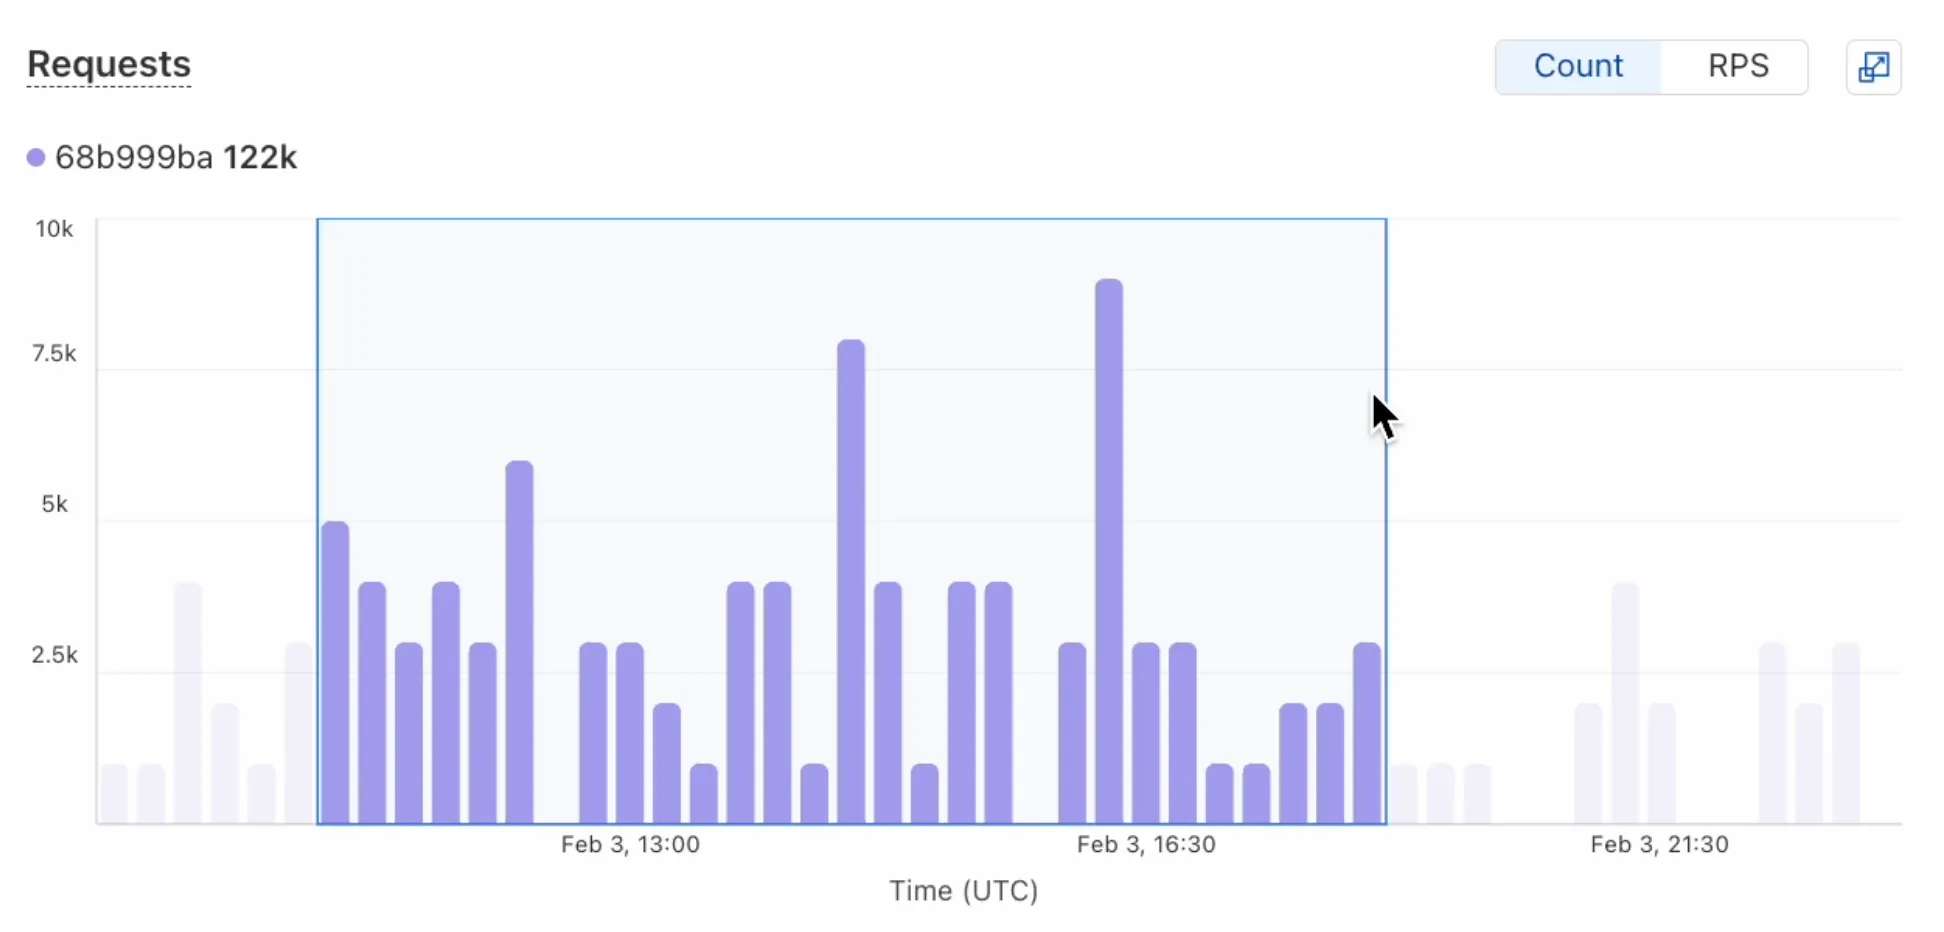
- Drag-and-select using a graphical timepicker for precise metric selection.
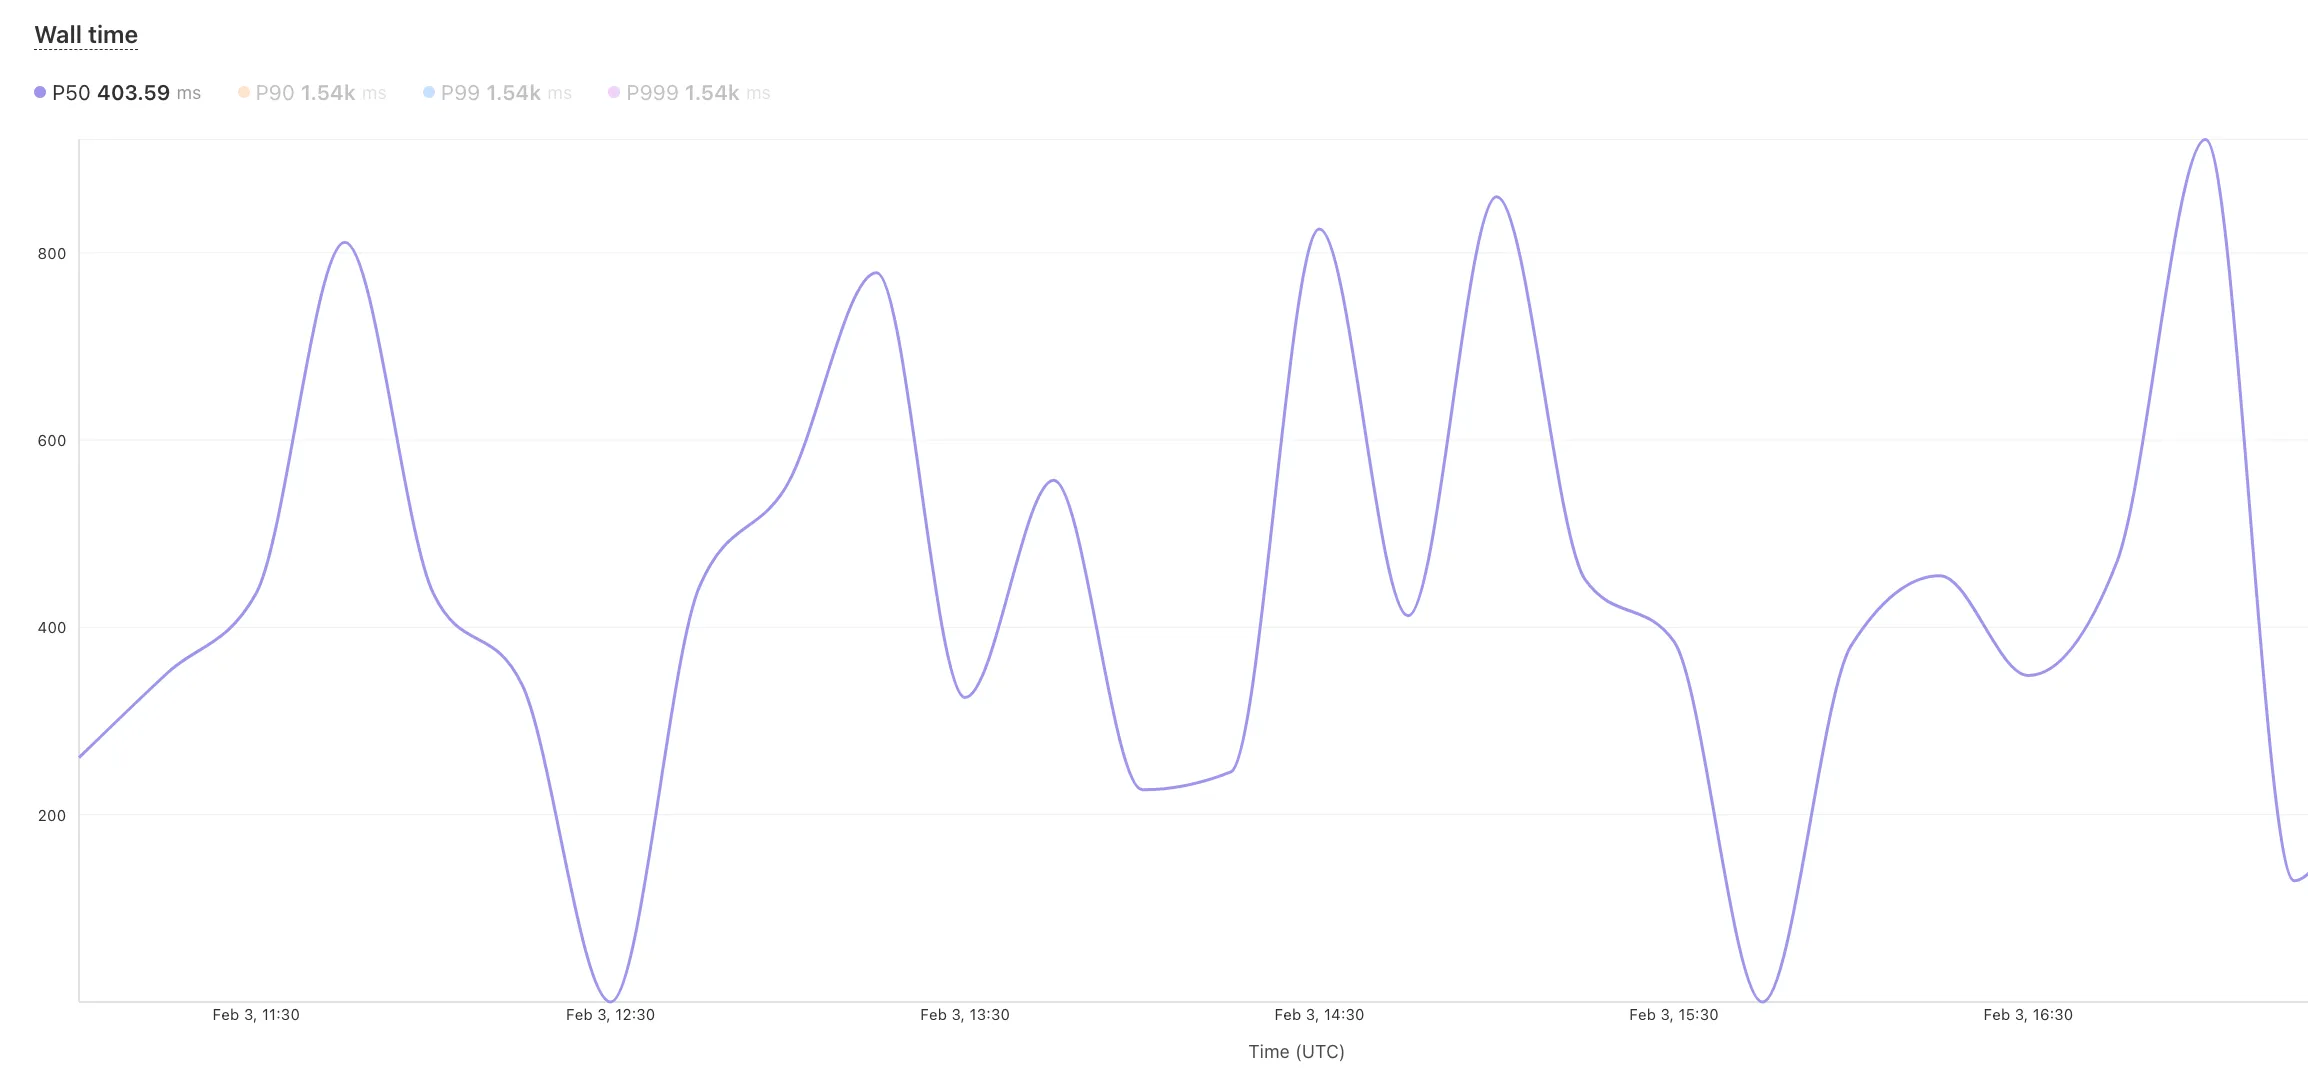
- Use histograms to visualize cumulative metrics, allowing you to bucket and compare rates over time.
- Focus on Worker versions by directly interacting with the version numbers in the legend.
- Monitor and compare active gradual deployments.
- Track error rates across versions with grouping both by version and by invocation status.
- Measure how Smart Placement improves request duration.
Learn more about metrics.
You can now transform HTML elements with streamed content using
HTMLRewriter.Methods like
replace,append, andprependnow acceptResponseandReadableStreamvalues asContent.This can be helpful in a variety of situations. For instance, you may have a Worker in front of an origin, and want to replace an element with content from a different source. Prior to this change, you would have to load all of the content from the upstream URL and convert it into a string before replacing the element. This slowed down overall response times.
Now, you can pass the
Responseobject directly into thereplacemethod, and HTMLRewriter will immediately start replacing the content as it is streamed in. This makes responses faster.index.js class ElementRewriter {async element(element) {// able to replace elements while streaming content// the fetched body is not buffered into memory as part// of the replacelet res = await fetch("https://upstream-content-provider.example");element.replace(res);}}export default {async fetch(request, env, ctx) {let response = await fetch("https://site-to-replace.com");return new HTMLRewriter().on("[data-to-replace]", new ElementRewriter()).transform(response);},};index.ts class ElementRewriter {async element(element: any) {// able to replace elements while streaming content// the fetched body is not buffered into memory as part// of the replacelet res = await fetch('https://upstream-content-provider.example');element.replace(res);}}export default {async fetch(request, env, ctx): Promise<Response> {let response = await fetch('https://site-to-replace.com');return new HTMLRewriter().on('[data-to-replace]', new ElementRewriter()).transform(response);},} satisfies ExportedHandler<Env>;For more information, see the
HTMLRewriterdocumentation.
Browser Rendering now supports 10 concurrent browser instances per account and 10 new instances per minute, up from the previous limits of 2.
This allows you to launch more browser tasks from Cloudflare Workers.
To manage concurrent browser sessions, you can use Queues or Workflows:
index.js export default {async queue(batch, env) {for (const message of batch.messages) {const browser = await puppeteer.launch(env.BROWSER);const page = await browser.newPage();try {await page.goto(message.url, {waitUntil: message.waitUntil,});// Process page...} finally {await browser.close();}}},};index.ts interface QueueMessage {url: string;waitUntil: number;}export interface Env {BROWSER_QUEUE: Queue<QueueMessage>;BROWSER: Fetcher;}export default {async queue(batch: MessageBatch<QueueMessage>, env: Env): Promise<void> {for (const message of batch.messages) {const browser = await puppeteer.launch(env.BROWSER);const page = await browser.newPage();try {await page.goto(message.url, {waitUntil: message.waitUntil,});// Process page...} finally {await browser.close();}}},};
When using a Worker with the
nodejs_compatcompatibility flag enabled, you can now use the following Node.js APIs:You can use
node:net↗ to create a direct connection to servers via a TCP sockets withnet.Socket↗.index.js import net from "node:net";const exampleIP = "127.0.0.1";export default {async fetch(req) {const socket = new net.Socket();socket.connect(4000, exampleIP, function () {console.log("Connected");});socket.write("Hello, Server!");socket.end();return new Response("Wrote to server", { status: 200 });},};index.ts import net from "node:net";const exampleIP = "127.0.0.1";export default {async fetch(req): Promise<Response> {const socket = new net.Socket();socket.connect(4000, exampleIP, function () {console.log("Connected");});socket.write("Hello, Server!");socket.end();return new Response("Wrote to server", { status: 200 });},} satisfies ExportedHandler;Additionally, you can now use other APIs including
net.BlockList↗ andnet.SocketAddress↗.Note that
net.Server↗ is not supported.You can use
node:dns↗ for name resolution via DNS over HTTPS using Cloudflare DNS ↗ at 1.1.1.1.index.js import dns from "node:dns";let response = await dns.promises.resolve4("cloudflare.com", "NS");index.ts import dns from 'node:dns';let response = await dns.promises.resolve4('cloudflare.com', 'NS');All
node:dnsfunctions are available, exceptlookup,lookupService, andresolvewhich throw "Not implemented" errors when called.You can use
node:timers↗ to schedule functions to be called at some future period of time.This includes
setTimeout↗ for calling a function after a delay,setInterval↗ for calling a function repeatedly, andsetImmediate↗ for calling a function in the next iteration of the event loop.index.js import timers from "node:timers";console.log("first");timers.setTimeout(() => {console.log("last");}, 10);timers.setTimeout(() => {console.log("next");});index.ts import timers from "node:timers";console.log("first");timers.setTimeout(() => {console.log("last");}, 10);timers.setTimeout(() => {console.log("next");});


Workers Builds, the integrated CI/CD system for Workers (currently in beta), now lets you cache artifacts across builds, speeding up build jobs by eliminating repeated work, such as downloading dependencies at the start of each build.
-
Build Caching: Cache dependencies and build outputs between builds with a shared project-wide cache, ensuring faster builds for the entire team.
-
Build Watch Paths: Define paths to include or exclude from the build process, ideal for monorepos to target only the files that need to be rebuilt per Workers project.
To get started, select your Worker on the Cloudflare dashboard ↗ then go to Settings > Builds, and connect a GitHub or GitLab repository. Once connected, you'll see options to configure Build Caching and Build Watch Paths.
-
You can now use the
cacheproperty of theRequestinterface to bypass Cloudflare's cache when making subrequests from Cloudflare Workers, by setting its value tono-store.index.js export default {async fetch(req, env, ctx) {const request = new Request("https://cloudflare.com", {cache: "no-store",});const response = await fetch(request);return response;},};index.ts export default {async fetch(req, env, ctx): Promise<Response> {const request = new Request("https://cloudflare.com", { cache: 'no-store'});const response = await fetch(request);return response;}} satisfies ExportedHandler<Environment>When you set the value to
no-storeon a subrequest made from a Worker, the Cloudflare Workers runtime will not check whether a match exists in the cache, and not add the response to the cache, even if the response includes directives in theCache-ControlHTTP header that otherwise indicate that the response is cacheable.This increases compatibility with NPM packages and JavaScript frameworks that rely on setting the
cacheproperty, which is a cross-platform standard part of theRequestinterface. Previously, if you set thecacheproperty onRequest, the Workers runtime threw an exception.If you've tried to use
@planetscale/database,redis-js,stytch-node,supabase,axiom-jsor have seen the error messageThe cache field on RequestInitializerDict is not implemented in fetch— you should try again, making sure that the Compatibility Date of your Worker is set to on or after2024-11-11, or thecache_option_enabledcompatibility flag is enabled for your Worker.- Learn how the Cache works with Cloudflare Workers
- Enable Node.js compatibility for your Cloudflare Worker
- Explore Runtime APIs and Bindings available in Cloudflare Workers
Workflows is now in open beta, and available to any developer a free or paid Workers plan.
Workflows allow you to build multi-step applications that can automatically retry, persist state and run for minutes, hours, days, or weeks. Workflows introduces a programming model that makes it easier to build reliable, long-running tasks, observe as they progress, and programmatically trigger instances based on events across your services.
You can get started with Workflows by following our get started guide and/or using
npm create cloudflareto pull down the starter project:Terminal window npm create cloudflare@latest workflows-starter -- --template "cloudflare/workflows-starter"You can open the
src/index.tsfile, extend it, and usewrangler deployto deploy your first Workflow. From there, you can:- Learn the Workflows API
- Trigger Workflows via your Workers apps.
- Understand the Rules of Workflows and how to adopt best practices